
Nginx를 설치하고 HTTPS를 적용해보자 (with Ncloud, Google Domains) 에서 Nginx를 통해 HTTPS를 적용해봤습니다.
이번에는 Ncloud에서 인스턴스를 생성하여 3-Tier Architecture를 적용해보도록 하겠습니다.
목차
- 3-Tier Architecture란?
- Presentation Tier 구현하기
- Application Tier 구현하기
2편 추가 예정
- Data Tier 구현하기
- Object Storage로 데이터 백업하기
3-Tier Architecture란?
이번에 프로젝트를 하면서 처음으로 인프라 구조에 대해서 고민을 하게 되었습니다. 인프라에 대해서 공부를 해본 적이 없다 보니 어떤 구조가 있고 어떻게 설계를 해야지 효율적인지 몰라서 처음에는 생각을 많이 했습니다. 그러다가 3-Tier Architecture를 알게 되었고 현재 프로젝트 규모와 맞지 않은 아키텍처이지만 학습에 의의를 두고 적용해보려고 합니다.
1-Tier Architecture
3-Tier Architecture를 알기 전에 먼저 1-Tier Architecture에 대해 이해해야 합니다.
사실 이름만 거창할 뿐이지 내용은 간단합니다. 하나의 서버/컴퓨터로 Web Server, WAS, Database를 모두 구성하는 것입니다.

1-Tier Architecture 장점
- 서버가 1대이므로 장애가 발생하는 범위가 좁다.
- 관리할 부분이 적다.
- 비용 부담이 덜 든다.
1-Tier Architecture 단점
- 서버가 1대이므로 새로운 서버로 변경한다면 모든 설정을 새로 구성해야 한다.
- 특정 계층의 성능 업그레이드를 할 수 없다.
2-Tier Architecture
2-Tier Architecture는 Web Server와 WAS를 가지고 있는 Client tier 서버 1대와 DB를 가지고 있는 Data tier 서버 1대로 구성합니다.
Data Tier가 분리되어 있기 때문에 안전하게 관리할 수 있습니다.
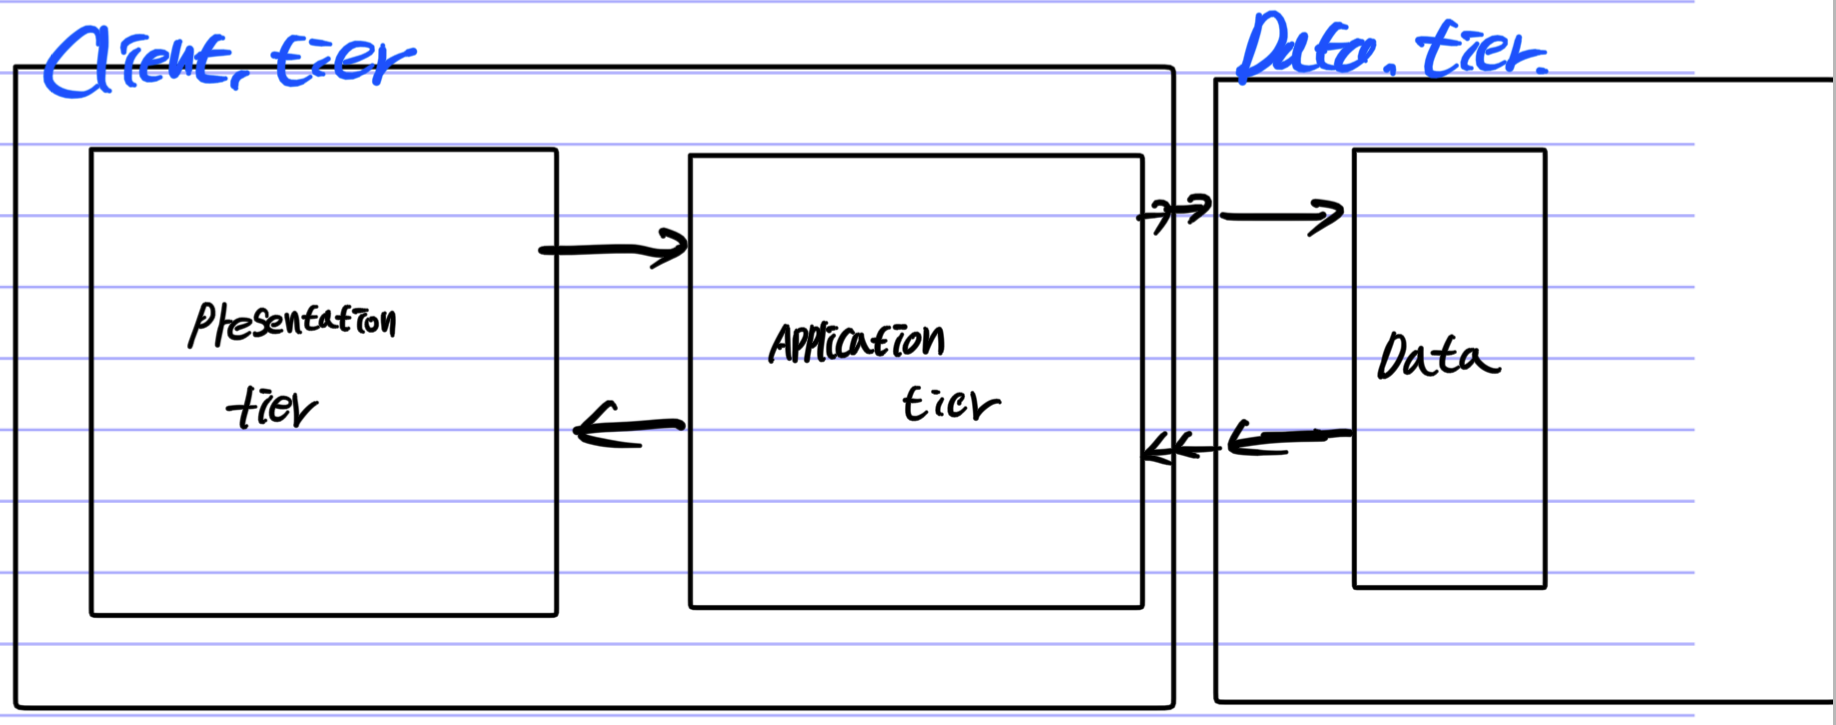
3-Tier Architecture
3-Tier Architecture는 Web Server, WAS, DB를 각각의 서버가 관리합니다.

3-Tier Architecture 장점
- 서버가 3대이므로 업무 분담이 가능해진다.
- 서버가 나눠져 있으므로 오류가 발생해도 피해를 최소화할 수 있다.
- 특정 계층만 성능 업그레이드가 가능하다.
3-Tier Architecture 단점
- 서버가 3대이므로 관리해야 할 부분이 늘어난다.
- 비용이 많이 발생한다.
다른 3-Tier Architecture 구조
Development - Staging - Production 3 - Tier Architecture
Git과 상당히 유사한 구조를 가진 Development - Staging - Production 3 - Tier Architecture입니다.
해당 구조는 각각의 서버가 1-Tier Architecture처럼 모든 구성을 가지되 개발, 테스트, 배포 환경을 가지도록 합니다.
충분히 테스트를 거친 다음에 배포 환경으로 옮겨 안전하게 배포를 할 수 있다는 장점을 가지며, 또한 Git처럼 언제든지 백업을 할 수 있습니다.

Backup DB server
기존에 Web Server, WAS, DB로 나눴던 구조와는 다르게 DB를 더 안전하게 관리하게 위해 Backup DB Server를 생성하고 Web Server와 WAS를 하나의 서버로 묶어줍니다.

Presentation Tier 구현하기
3-Tier Architecture에서 Presentation Tier는 Web Server이므로 React에서 생성해준 정적 파일을 불러오는 역할을 합니다.
React와 HTTPS 관련 설정은 Nginx를 설치하고 HTTPS를 적용해보자 (with Ncloud, Google Domains) 를 참고하여 완료해줍니다.
이후 Application Tier에서는 WAS 역할을 해주는 API server를 만들어줄 겁니다. 여기서 API server는 리버스 프락시를 사용하여 사용자가 서버의 존재를 알지 못하도록 설정을 해볼 겁니다.
Upstream
3-Tier Architecture에서 Presentation Tier관점으로 볼 때 upstream 서버는 데이터를 가공하고 전달해주는 WAS가 됩니다.
nginx upstream 설정을 통해 특정 역할을 하는 서버들을 만들어 연동을 하여 로드밸런싱, 속도 개선을 할 수 있습니다.
또한 proxy_pass를 통해 리버스 프록시를 가능하게 해 줍니다.
따라서 아래 코드처럼 설정해줍니다.
upstream backend{
        server 115.85.180.192;
        keepalive 32;
}


server {
        listen 443;
        ssl on;

        server_name test-client.nemne.dev;

        ssl_certificate /etc/letsencrypt/live/test-client.nemne.dev/fullchain.pem;
        ssl_certificate_key /etc/letsencrypt/live/test-client.nemne.dev/privkey.pem;

        location / {
                root /root/WEB27-NogariHouse/client/build;
                index index.html index.htm;
                try_files $uri /index.html;
        }

        location /api {
                proxy_pass http://backend;
                proxy_http_version 1.1;
                proxy_set_header Connection "";
        }

}
Application Tier 구현하기
먼저 위 설정에서 API 서버를 호출할 때 /api를 호출해야 하므로 서버에서도 동일하게 적용해줍니다.
//app.js

const apiRouter = require('~~~');

...

app.use('/api', apiRouter);

...

// apiRouter.js

const express = require('express');
const router = express.Router();

router.get('/', function(req, res) {
  res.json([1, 2, 4, 3, 5, 6, 8]);
});
서버는 항상 동작하고 있어야 하므로 pm2를 이용하여 무중단 배포를 해줍니다.
sudo npm install pm2@latest -g

pm2 start app.js --name test
pm2 list를 이용하여 동작하는지 확인해줍니다.

이후 nginx 설정을 아래처럼 해줍니다.
server {
        listen 80;

        root /var/www/html;

        index index.html index.htm index.nginx-debian.html;

        server_name test-server.nemne.dev;

        location / {
                add_header 'Access-Control-Allow-Origin' '*';
                proxy_pass http://localhost:3000;
                try_files $uri $uri/ =404;
        }

        location /api/ {
                proxy_pass http://localhost:3000;
                proxy_http_version 1.1; # HTTP/1.1 버전에서 지원하는 프로토콜 전환 메커니즘을 사용
                proxy_set_header Upgrade $http_upgrade; #hop-by-hop 헤더를 사용
                proxy_set_header Connection 'upgrade';
                proxy_set_header Host $host;
                proxy_cache_bypass $http_upgrade;
        }

}
설정을 완료하고 systemctl restart nginx를 실행 후 Presentation tier에서 지정한 test-client.nemne.dev로 접속하면 서버 주소가 안 나오고 요청이 처리되는 것을 확인할 수 있습니다.

'문제해결' 카테고리의 다른 글
| Fluent Bit Alias 설정으로 Prometheus Metrics을 쉽게 파악하기 (2) | 2022.08.07 |
|---|---|
| EKS Helm에서 발생하는 Error: Kubernetes cluster unreachable 해결하기 (0) | 2022.07.15 |
| Nginx를 설치하고 HTTPS를 적용해보자 (with Ncloud, Google Domains) (0) | 2021.10.30 |
| NCloud로 서버 생성과 Mysql 연동 후 express 배포하기 - 2 (0) | 2021.09.23 |
| NCloud로 서버 생성과 Mysql 연동 후 express 배포하기 - 1 (2) | 2021.09.23 |


